
GUIDE - SOCKET ITENS - DEVILZMU
Revision 8 - Updated: 07/18/2022
- What is an item socket system?
- Step 1 - How to obtain items with Free Socket?
- Step 2 - Seed Creation
- Step 3 - Seed Sphere Mounting
- Step 4 - Applying Seed Sphere to the item
- Step 5 - Upgrade Sphere to level 6
- How to enable the socket bonus on an item
- How to enable the socket bonus in a character
I. What is an item socket system?
It's a game system that allows you to add options sockets on purple items that have free slots, these options allow you to customize the power of your items, adding higher attack, defense, life, attributes or debuffs to your opponent, there are countless possibilities and combinations to be made and we will explain each one of them in this thread.
All the ingredients required for this can be earned through farm items, bosses, automatic events and special events from our STAFF members.
DevilzMu has a few changes compared to other servers regarding the socket system, therefore whenever you have a question always check this guide because any change made in this system will also be updated in this guide.
II. Step 1 - How to get free socket items?
Items with socket free are dropped from the map of Raklion and Selupan. (For more information about Raklion and Selupan, click here and view the guide)
The other way to get it is through our special Boxes (Always check the boxs description to verify if the drops items on it have free socket) which are available in our Web Shopping in SGolds, however these boxes are rotational and in certain times it can happen that no drop boxes with socket items are available in our Web Shopping.
III. Step 2 - Creating seeds
First: Find the NPC Seed Master
(Elbeland, X:46 Y: 242).

Second: Select the NPC option "Seed Extraction" and combine:
| ITEMS |
QUANTIDADE |
| Any item exec wit 3 add, opt +16, level +6 or superior |
3 |
| Any Ancient Item +9 |
2 |
| Jewel of Harmony Bundle +1 (10un) |
1 |
| Jewel of Chaos Bundle +3 (30un) |
1 |
| Jewel of Creation Bundle +3 (30un) |
1 |
| Jewel of Soul Bundle +1 (10un) |
1 |
2. Cost 1,000 DVZ Points;;
In case of failure all items will be consumed by the NPC and if successful the NPC will give you one of the seeds with a random attribute, check the list below:
| MINIATURE |
TYPE |
ATTRIBUTES |
1
 |
FIRE |
- "Increases Attack/Damage magic (per Level)"
- "Attack speed increase"
- "Increases maximum attack/damage magic
- "Minimum Attack/Magic Damage increase"
- "Attack/Magic damage increase"
- "AG usage decrease "
|
1
 |
WATER |
- "Defense success rate increase"
- "Defense increase"
- "Shield defense increase"
- "Damage reduction"
- "Damage reflection"
|
1
 |
ICE |
- "Chance to steal your opponent's life"
- "Chance to cause bleeding"
- "Skill damage increase"
- "Attack rate increase"
- "Decreases durability loss of items"
|
1
 |
WIND |
- "Life recovery increase"
- "Maximum life increase"
- "Maximum mana increase"
- "Mana recovery increase"
- "Maximum AG increase"
- "AG recovery increase"
|
 |
LIGHTNING |
- "Excellent damage increase"
- "Excellent damage rate increase"
- "Critical damage increase"
- "Critical damage rate increase"
|
 |
EARTH |
- "Max Life increase"
- "Strength increase"
- "Dexterity increase"
- "Energy increase"
- "Vitality increase"
|
IV. Step 3 - Mounting a Seed Sphere
First: To build a Seed Sphere, besides the Seed you created in step 2, you will need a Sphere (this one isn't created, but dropped as explained below) which has 5 types, as shown below.
Second: With the desired Sphere and Seed, search for the NPC Seed Master ( the same one as in step 2), and choose the following option: "Combine Seed Sphere", and combine with the following ingredients:
 Sphere (Mono)
Drop from monsters above level 100;
Ex: Magic Skeleton, Fire Golem, Omega Wing, Sapi-Tres, Ice Walker, and others more stronger)
| INGREDIENTS |
QUANTITY |
| Seed (created on step 2) |
1 |
| Sphere |
1 |
| Jewel of Chaos |
5 |
| Jewel of Creation |
5 |
1. Standard chance of success is 100%;
2. Cost of 300 DVZ Points;
 Sphere (Di)
Monster drop from over level 120;
Ex: Ice Giant, Genocider Warrior, Zombie Fighter, Resurrected Gladiator, among other more powerful ones
| INGREDIENTS |
QUANTITY |
| Seed (Created on step 2) |
1 |
| Sphere |
1 |
| Jewel of Chaos Bundle +1 (10un) |
1 |
| Jewel of Creation Bundle +1 (10un) |
1 |
1. Standard chance of success is 100%;
2. Cost of 500 DVZ Points;
 Sphere (Tri)
Monster drop from over level 140;
Ex: Kundun's Illusion (kalima 6), Ash Slaughter, among other more powerful ones
| INGREDIENTS |
QUANTITY |
| Seed (created on step 2) |
1 |
| Sphere |
1 |
| Jewel of Chaos Bundle +2 (20un) |
1 |
| Jewel of Creation Bundle +1 (10un) |
1 |
1. Standard chance of success is 90%;
2. Cost of 2.000 DVZ Points;
 Sphere (Tetra)
Monster drop from over level 142;
Ex: Iron Knight, Great Golden Dragon, Dark Giant, Fire Flame Ghost, Dark Iron Knight, among other more powerful ones
| INGREDIENTE |
QUANTIDADE |
| Seed (created on step 2) |
1 |
| Sphere |
1 |
| Jewel of Chaos Bundle +3 (30un) |
2 |
| Jewel of Creation Bundle +3 (30un) |
2 |
| Item 380 (1 exec, +9 e 380 activated) |
1 |
1. Standard chance of success is 80%;
2. Cost of 4.000 DVZ Points;
 Sphere (Pente)
It's an exclusively drop from Selupan and can be given as a reward at special events.
| INGREDIENTS |
QUANTITY |
| Seed (created on step 2) |
1 |
| Sphere |
1 |
| Jewel of Chaos Bundle +3 (30un) |
4 |
| Jewel of Creation Bundle +3 (30un) |
4 |
| Item 380 (2 exec, +13 and 380 enabled) |
1 |
1. Standard chance of success is 75%;
2. Cost of 8.000 DVZ Points;
In case of failure the NPC will consume all items within the combination.
In case of success, you will receive a Seed Sphere, the type will be according to the seed you used and the attribute value or % will be according to the Sphere, the better the Sphere, the higher the attribute effect value, according to the chart below:
SEED SPHERE (FIRE):
| ATTRIBUTE |
EFFECT |
| "Attack/Magic damage increase (per Level)" |
- Sphere (Mono): 20
- Sphere (Di): 19
- Sphere (Tri): 18
- Sphere (Tetra): 17
- Sphere (Pente): 14
- Sphere (Level 6): 13
|
| "Attack speed increase" |
- Sphere (Mono): +70
- Sphere (Di): +80
- Sphere (Tri): +90
- Sphere (Tetra): +100
- Sphere (Pente): +110
- Sphere (Level 6): +115
|
| "Maximum Attack/Magic damage increase" |
- Sphere (Mono): +600
- Sphere (Di): +640
- Sphere (Tri): +700
- Sphere (Tetra): +800
- Sphere (Pente): +1000
- Sphere (Level 6): +1100
|
| "Minimum Attack/Magic Damage increase" |
- Sphere (Mono): +400
- Sphere (Di): +440
- Sphere (Tri): +500
- Sphere (Tetra): +600
- Sphere (Pente): +700
- Sphere (Level 6): +750
|
| "Attack/Magic damage increase" |
- Sphere (Mono): +400
- Sphere (Di): +440
- Sphere (Tri): +500
- Sphere (Tetra): +600
- Sphere (Pente): +700
- Sphere (Level 6): +750
|
| "AG usage decrease " |
- Sphere (Mono): 40%
- Sphere (Di): 41%
- Sphere (Tri): 42%
- Sphere (Tetra): 43%
- Sphere (Pente): 44%
- Sphere (Level 6): 45%
|
| attribute |
effect |
| "Defense success rate increase" |
- Sphere (Mono): +10%
- Sphere (Di): +11%
- Sphere (Tri): +12%
- Sphere (Tetra): +13%
- Sphere (Pente): +14%
- Sphere (Level 6): +16%
|
| "Defense increase" |
- Sphere (Mono): +300
- Sphere (Di): +330
- Sphere (Tri): +360
- Sphere (Tetra): +390
- Sphere (Pente): +420
- Sphere (Level 6): +460
|
| "Shield defense increase" |
- Sphere (Mono): +7%
- Sphere (Di): +10%
- Sphere (Tri): +15%
- Sphere (Tetra): +20%
- Sphere (Pente): +30%
- Sphere (Level 6): +33%
|
| "Damage reduction" |
- Sphere (Mono): +4%
- Sphere (Di): +5%
- Sphere (Tri): +6%
- Sphere (Tetra): +7%
- Sphere (Pente): +8%
- Sphere (Level 6): +9%
|
| "Damage reflection" |
- Sphere (Mono): +5%
- Sphere (Di): +6%
- Sphere (Tri): +7%
- Sphere (Tetra): +8%
- Sphere (Pente): +9%
- Sphere (Level 6): +10%
|
| attribute |
effect |
| "Chance to steal your opponent's life" |
- Sphere (Mono): +1%
- Sphere (Di): +2%
- Sphere (Tri): +3%
- Sphere (Tetra): +4%
- Sphere (Pente): +5%
- Sphere (Level 6): +6%
|
| "Chance to cause bleeding" |
- Sphere (Mono): +1%
- Sphere (Di): +2%
- Sphere (Tri): +3%
- Sphere (Tetra): +4%
- Sphere (Pente): +5%
- Sphere (Level 6): +6%
|
| "Skill damage increase" |
- Sphere (Mono): 600
- Sphere (Di): 700
- Sphere (Tri): 800
- Sphere (Tetra): 900
- Sphere (Pente): 1000
- Sphere (Level 6): 1100
|
| "Attack rate increase" |
- Sphere (Mono): 300
- Sphere (Di): 350
- Sphere (Tri): 400
- Sphere (Tetra): 450
- Sphere (Pente): 500
- Sphere (Level 6): 600
|
| "Decreases durability loss of items" |
- Sphere (Mono): 30%
- Sphere (Di): 32%
- Sphere (Tri): 34%
- Sphere (Tetra): 36%
- Sphere (Pente): 38%
- Sphere (Level 6): 39%
|
| attribute |
effect |
| "Life recovery increase" |
- Sphere (Mono): +300
- Sphere (Di): +450
- Sphere (Tri): +600
- Sphere (Tetra): +750
- Sphere (Pente): +900
- Sphere (Level 6): +1050
|
| "Maximum life increase" |
- Sphere (Mono): +4%
- Sphere (Di): +5%
- Sphere (Tri): +6%
- Sphere (Tetra): +7%
- Sphere (Pente): +8%
- Sphere (Level 6): +9%
|
| "Maximum mana increase" |
- Sphere (Mono): +4%
- Sphere (Di): +5%
- Sphere (Tri): +6%
- Sphere (Tetra): +7%
- Sphere (Pente): +8%
- Sphere (Level 6): +9%
|
| "Mana recovery increase" |
- Sphere (Mono): 500
- Sphere (Di): 750
- Sphere (Tri): 1000
- Sphere (Tetra): 1250
- Sphere (Pente): 1500
- Sphere (Level 6): 1750
|
| "Maximum AG increase" |
- Sphere (Mono): 500
- Sphere (Di): 750
- Sphere (Tri): 1000
- Sphere (Tetra): 1250
- Sphere (Pente): 1500
- Sphere (Level 6): 1750
|
| "AG recovery increase" |
- Sphere (Mono): 300
- Sphere (Di): 450
- Sphere (Tri): 600
- Sphere (Tetra): 750
- Sphere (Pente): 900
- Sphere (Level 6): 1050
|
| attribute |
effect |
| "Excellent damage increase" |
- Sphere (Mono): 250
- Sphere (Di): 340
- Sphere (Tri): 420
- Sphere (Tetra): 500
- Sphere (Pente): 660
- Sphere (Level 6): 820
|
| "Excellent damage rate increase" |
- Sphere (Mono): +10%
- Sphere (Di): +11%
- Sphere (Tri): +12%
- Sphere (Tetra): +13%
- Sphere (Pente): +14%
- Sphere (Level 6): +15%
|
| "Critical damage increase" |
- Sphere (Mono): 500
- Sphere (Di): 530
- Sphere (Tri): 590
- Sphere (Tetra): 620
- Sphere (Pente): 650
- Sphere (Level 6): 680
|
| "Critical damage rate increase" |
- Sphere (Mono): +8%
- Sphere (Di): +9%
- Sphere (Tri): +10%
- Sphere (Tetra): +11%
- Sphere (Pente): +12%
- Sphere (Level 6): +13%
|
| attribute |
effect |
"Strength increase"
(base attributes) |
- Sphere (Mono): 500
- Sphere (Di): 1000
- Sphere (Tri): 1500
- Sphere (Tetra): 1750
- Sphere (Pente): 2000
- Sphere (Level 6): 2750
|
"Dexterity increase"
(base attributes) |
- Sphere (Mono): 500
- Sphere (Di): 1000
- Sphere (Tri): 1500
- Sphere (Tetra): 2000
- Sphere (Pente): 2500
- Sphere (Level 6): 3000
|
"Max Life increase"
(life crystal) |
- Sphere (Mono): 2000
- Sphere (Di): 4000
- Sphere (Tri): 6000
- Sphere (Tetra): 8000
- Sphere (Pente): 10000
- Sphere (Level 6): 12000
|
"Energy increase"
(base attributes) |
- Sphere (Mono): 500
- Sphere (Di): 1000
- Sphere (Tri): 1500
- Sphere (Tetra): 1750
- Sphere (Pente): 2000
- Sphere (Level 6): 2750
|
"Vitality increase"
(base attributes) |
- Sphere (Mono): 1000
- Sphere (Di): 2000
- Sphere (Tri): 3000
- Sphere (Tetra): 4050
- Sphere (Pente): 5000
- Sphere (Level 6): 6000
|
V. Step 4 - Applying the Seed Sphere to an item
First: Find the NPC Seed Researcher at the following coordinates
(Elberland X: 51 Y: 241)
 Second:
 Choose the option
Aplying a seed sphere, and apply it to the item following the combinations shown below:
SEED SPHERE MONO:


| DEFENSE ITEMS |
QUANTITY |
| Defense Items (shield and set) |
1 |
| Seed Sphere (Water, Wind or Earth) |
1 |
| Jewel of Chaos Bundle +1 (10un) |
2 |
| Jewel of Creation Bundle +1 (10un) |
1 |
** Cost of 500 DVZ Points;
| ATTACK ITEMS |
QUANTITY |
| Attack items (weapons in general) |
1 |
| Seed Sphere (Fire, Ice, Lightening) |
1 |
| Jewel of Chaos Bundle +1 (10un) |
3 |
| Jewel of Creation Bundle +1 (10un) |
3 |
** Cost of 1.000 DVZ Points;
SEED SPHERE DI:


| DEFENSE ITEMS |
QUANTITY |
| Defense items (shield and set) |
1 |
| Seed Sphere (Water, Wind or Earth) |
1 |
| Jewel of Chaos Bundle +2 (20un) |
1 |
| Jewel of Creation Bundle +2 (20un) |
1 |
** Cost of 800 DVZ Points;
| ATTACK ITEMS |
QUANTITY |
| Attack items (weapons in general) |
1 |
| Seed Sphere (Fire, Ice, Lightening) |
1 |
| Jewel of Chaos Bundle +2 (20un) |
3 |
| Jewel of Creation Bundle +2 (20un) |
3 |
** Cost of 1.600 DVZ Points;
SEED SPHERE TRI:


| DEFENSE ITEMS |
QUANTITY |
| Defense items (shield and set) |
1 |
| Seed Sphere (Water, Wind or Earth) |
1 |
| Jewel of Chaos Bundle +3 (30un) |
2 |
| Jewel of Creation Bundle +3 (30un) |
1 |
** Cost of 1.200 DVZ Points;
| ATTACK ITEMS |
QUANTITY |
| Attack Items (weapons in general) |
1 |
| Seed Sphere (Fire, Ice, Lightening) |
1 |
| Jewel of Chaos Bundle +3 (30un) |
3 |
| Jewel of Creation Bundle +3 (30un) |
3 |
** Cost of 2.400 DVZ Points;
SEED SPHERE TETRA:


| DEFENSE ITEMS |
QUANTITY |
| Defense items (shield and set) |
1 |
| Seed Sphere (Water, Wind or Earth) |
1 |
| Jewel of Chaos Bundle +3 (30un) |
3 |
| Jewel of Creation Bundle +3 (30un) |
3 |
** Cost of 10.000 DVZ Points;
| ATTACK ITEMS |
QUANTITY |
| Attack items (weapons in general) |
1 |
| Seed Sphere (Fire, Ice, Lightening) |
1 |
| Jewel of Chaos Bundle +3 (30un) |
9 |
| Jewel of Creation Bundle +3 (30un) |
9 |
** Cost of 25.000 DVZ Points;
SEED SPHERE PENTE:


| DEFENSE ITEMS |
QUANTITY |
| Defense items (shield and set) |
1 |
| Seed Sphere (Water, Wind or Earth) |
1 |
| Jewel of Chaos Bundle +3 (30un) |
5 |
| Jewel of Creation Bundle +3 (30un) |
5 |
| Jewel of Harmony Bundle +3 (30un) |
1 |
** Cost of 20.000 DVZ Points;
| ATTACK ITEMS |
QUANTITY |
| Attack Items (Weapons in general) |
1 |
| Seed Sphere (Fire, Ice, Lightening) |
1 |
| Jewel of Chaos Bundle +3 (30un) |
10 |
| Jewel of Creation Bundle +3 (30un) |
10 |
| Jewel of Harmony Bundle +3 (30un) |
1 |
** Cost of 45.000 DVZ Points;
Restrictions: You cannot duplicate the same option on the item, you can repeat the element, but not the same element and attribute.
VI. Upgrade to Sphere level 6
After obtaining a sphere level 5 (pente), you can upgrade it to level 6 using the
Sphere Upgrade Rune this way:
Step 1: Obtaining and Evolving the Sphere Upgrade Rune
 Sphere Upgrade Rune
Drop from box: Illusion Temple Relic - Box;
Available in Illusion Temple (Click here to view more)
To upgrade a Seed Sphere to level 6, you need to get the Sphere Upgrade Rune and upgrade it to level 5 using Seed Spheres.
 Simply drop the Seed Sphere you wish to expend to upgrade the Sphere Upgrade Rune on top of it.
There is the chance of failure while leveling up. In that case, your Sphere will be consumed and the Sphere Upgrade Rune kept.
The better the Seed Sphere you use for the upgrade, the greater the chance of Success.
Step 2: Upgrading the Seed Sphere to level 6 using the Sphere Upgrade Rune
First: Find the NPC Seed Master at the following coordinate
(Elbeland, X:46 Y: 242).
Second: Select the NPC Option that says "Seed Sphere Upgrade" and combine:
| ITEM |
QUANTITY |
| Seed Sphere (Pente) |
1 |
| Sphere Upgrade Rune +5 |
1 |
All items will be gone.
** Cost of 100.000 DVZ Points;
VII. How to activate socket bonus in an item
In order to activate the socket bonus on the item, you have to follow a sequence order when applying your Seed Spheres, the order has to be followed according to the chart below:
| Item |
Order and effect |
Chance to activate |
| Weapons (except staff) |
SLOT1: Fire, SLOT2: Lightning, SLOT3: Ice
Attack power +1100
or
SLOT1: Lightning, SLOT2: Ice, SLOT3: Fire
Increases skill attack +1100 |
30% |
| Staffs |
SLOT1: Fire, SLOT2: Lightning, SLOT3: Ice
Increases attack/Damage spells +1100
or
SLOT1: Lightning, SLOT2: Ice, SLOT3: Fire
Increases skill attack +1100 |
30% |
| Sets |
SLOT1: Water, SLOT2: Earth, SLOT3: Wind
Increased defense +2200
or
SLOT1: Earth, SLOT2: Wind, SLOT3: Water
Increase maximum life +2900 |
30% |
2. If your item already has an active bonus, any changewhether it is applying new seeds sphere or destroying a slot, a new draw will be made and there's a chance that your bonus will be removed;
3. If you destroy any option from the order of the first three Seeds Sphere, your bonus is automatically removed;
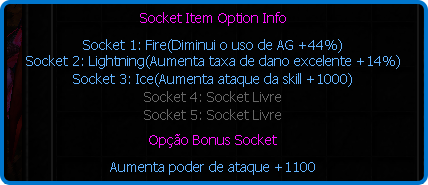
Here is an example of the weapon's description with an activated bonus:

VIII. How to activate socket bonuses in a character
This bonus is easier since you only need to equip your character with the items that have a quantity of each element, as shown in the list below:
| BONUS EFFECT |
QUANTITY OF ELEMENTS REQUIRED |
| Increases double damage rate +3% |
1x Fire, 1x Water, 1x Ice, 1x Wind, 1 Lightning and 1x Earth |
| Increases rate of ignoring opponent's defense |
1x Fire, 3x Water, 1x Ice, 3x Wind, 1x Lightning and 2x Earth |
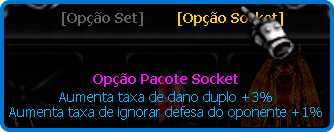
There's no proper order, but the system triggers the bonus upon the sum of elements of all items are equal to or greater than the one stated above.
Here's how it will appear in your inventory:

⚠️ IMPORTANT NOTICE: ⚠️
1. This thread reflects 100% of the settings that are currently on our server.
2. Note that an options system is always something complex and sometimes changes are required, whether it's nerfs, bufs or even new options so when creating your build be aware that it can be changed. However, all changes will be notified through our social media, website and we will update this topic accordingly.
3. Have you found any errors or have any suggestions for improving this guide? Send us through email at suporte@devilzmu.net
 FOLLOW US ON SOCIAL MEDIA


